Class Introduction
- Emergency Response Procedure Video
Some notes regarding the video:- The closest (and only, as far as I can tell) AED in this building is on the first floor, near the NorthEast corner of the building, next to the restrooms that are just inside that staircase.
- Joe Vines, who has created our floor's emergency response plan, says that in a REAL emergency, we can rip the computers off the tables and stack the tables against the door. He did ask that, in a DRILL, we use something else.
- Class Syllabus
- Homework Requirements
PHP Introduction
PHP, which stands for "PHP: Hypertext Preprocessor", is a widely-used Open Source general-purpose scripting language that is especially suited for Web development and can be embedded into HTML. Its syntax draws upon C, Java, and Perl, and is easy to learn. The main goal of the language is to allow web developers to write dynamically generated web pages quickly, but you can do much more with PHP.
The PHP Hypertext Preprocessor is a programming language that allows web developers to create dynamic content that interacts with databases. PHP is basically used for developing web based software applications. So PHP is about connecting an HTML page to a server-side program or database.
PHP is a Web application server. At its heart is a database-to-Web gateway, meaning that it allows you to easily display records from a database on an HTML page.
A sample of what this means is a fake checkbook manager at my own server. (Use the username harry and a password of potter.)
You should note carefully that the tags that you see which look like <?php or ?> are PHP tags. These tags are recognized by the PHP server and are processed by that server as it constructs an HTML page to send back to the browser.
The code that is between <?php and ?> is PHP programming code.
Here is the source code for the main page (checkbook.php):
<?php
  require "loginAndLogout.php";
  require "config.php";
  $mysqli = new mysqli(DBSERVER, DBUSER, DBPWD, DBNAME);
  /* check connection */
  if (mysqli_connect_errno()) {
      printf("Connect failed: %s\n", mysqli_connect_error());
      exit();
  }
?>

<!DOCTYPE html>
<html>
<head>
  <meta charset="UTF-8">
  <title>Home Checkbook</title>
  <link rel="stylesheet" type="text/css" href="checkbook.css" />
  <script type="text/javascript" src="includes/jquery.js"></script>
  <script type="text/javascript">
    $(document).ready(function(){
      $(':submit').css("cursor", "pointer");
    });

    function logoff()
    {
      var returnValue = confirm("Do you really want to log off?");
      if (returnValue == true)
      {
        document.getElementById("autoLogoff").value = "1";
        return true;
      }
      else
      {
        return false;
      }
    }
  </script>
</head>
<body>
  <div id="checkDiv">
    <h1>Home Checkbook</h1>
    <br />
    <form action="addtrans.php" id="addtransForm" name="addtransForm" method="post">
      <input type="submit" value="Add a Transaction">
    </form>
    <form action="loginAndLogout.php" id="logoutForm" name="logoutForm" class="extraLeftSpace" method="post"
          onsubmit="return logoff();">
      <input type="hidden" name="autoLogoff" id="autoLogoff" value="0">
      <input type="submit" value="Log off">
    </form>
    <br />
    <br />
    <table id="mainTable">
      <tr>
        <th>  Date</th>
        <th>  Amount</th>
        <th>  Description</th>
        <th>   </th>
        <th>   </th>
      </tr>
    <?php
      $query = "SELECT * FROM Transaction ORDER BY TransDate DESC, Description";
		  $result = $mysqli->query($query);

      $row = $result->fetch_assoc();
			while ($row !== null)
      {
        $rowId = $row["ID"];
        $transDate = $row["TransDate"];
        $amount = $row["Amount"];
        $descr = $row["Description"];

        printf('<tr>
                  <td class="numeric">%s</td>
                  <td class="numeric">$%01.2f</td>
                  <td>%s</td>
                  <td>
                    <form action="edittrans.php" method="post">
                      <input type="hidden" name="rowID" value="%d" />
                      <input type="submit" value="Edit" />
                    </form>
                  </td>
                  <td>
                    <form action="deletetrans.php" method="post">
                      <input type="hidden" name="rowID" value="%d" />
                      <input type="submit" value="Delete" />
                    </form>
                  </td>
                </tr>',
          date("m/d/Y", strtotime($transDate)),
          $amount,
          $descr,
          $rowId,
          $rowId);
        $row = $result->fetch_assoc();
      }  //end while()
    ?>
      </table>
  <br />
  <form action="addtrans.php" id="addtransForm" name="addtransForm" method="post">
    <input type="submit" value="Add a Transaction">
  </form>
  <br />
  </div>
</body>
</html>
As we go along through the semester, you will discover what this page is doing. For now, simply note that the code between the
<?phpand
?>tags is doing these steps:
- Connect the page to a database.
- Get some information from a database table called "Transaction".
- Build an HTML table to display the information.
New PHP Versions
The most recent update to PHP as of November 2020 is version 8.
I will teach PHP version 5 in this class.
PHP has recently gone through several version updates, but version 5 is still the most commonly-used version. I expect that this situation will slowly change. In a few semesters I will probably be teaching PHP version 8.
The change from PHP version 4 to version 5 was major. But since I am teaching PHP version 5, we don't need to go into the differences.
The change from PHP version 5 to version 6 was very minor. I don't even teach about those parts of PHP which were affected by version 6, so we will not need to go into those differences, either.
The change from PHP version 6 to version 7 was also very minor.
But PHP version 8 has introduced some major differences from the previously-latest version, which was version 7.4.
On the other hand, if you will pay attention to what I teach about PHP version 5 this semester, you will be prepared for the eventual world in which PHP version 8 dominates. I will teach you good, standard PHP coding techniques which will not be a problem when you run your PHP pages under version 8.
But just in case you are interested in what has changed in version 8, the PHP.net site has a good and extensive listing of the changes, in their Migrating from PHP7.4.x to PHP 8.0.x page. I am going to list some of the most major and important changes below.
Support for Named Arguments has been added.
Support for Attributes has been added.
Support for the nullsafe operator (?->) has been added.
An optional trailing comma is now allowed in parameter lists.
Methods with the same name as the class are no longer interpreted as constructors. The __construct() method should be used instead.
each() has been removed. foreach() or ArrayIterator should be used instead.
The ability to use array_key_exists() with objects has been removed. isset() or property_exists() may be used instead.
If a parameter with a default value is followed by a required parameter, the default value has no effect. This is deprecated as of PHP 8.0.0 and can generally be resolved by dropping the default value, without a change in functionality.
PHP Processing Flow
The following diagram will give you a rough idea of how the information requests and responses flow among the browser, the Web Server, the PHP Server, the database server, and the SMTP (e-mail) server when you display a PHP page in your browser.
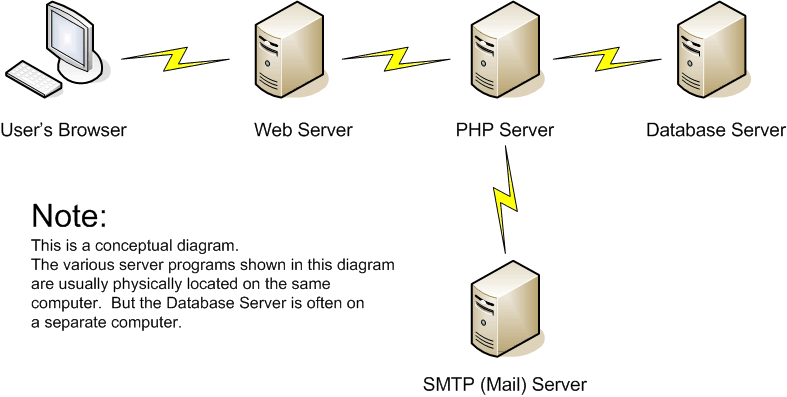
- You request the page -- either by clicking a link, or by typing the URL in the Address box of the browser.
- A request for the page is sent to the Web Server by the browser. (Along the way, a Domain Name Server (DNS) translates the URL into an IP address.)
- The Web server sees ".php" as the file extension of the page.
- The Web server forwards the request to the PHP server.
- The PHP server processes the page. It builds an HTML page as it processes the PHP tags that it finds.
-
If the PHP server finds a database command in the page:
- The PHP server sends a request to the database server for some database processing.
- The database server processes the request and sends the database information back to the PHP server.
- The PHP server processes the database information and adds the information to the HTML page that it is building.
-
If the PHP server finds an e-mail command in the page:
- The PHP server sends an outgoing e-mail message to the SMTP (e-mail) server.
- The SMTP (e-mail) server reports that it received the outgoing e-mail message.
- The PHP server completes the process of building the HTML page. It sends the HTML page back to the Web server.
- The Web server sends the HTML page back to the browser.
- The browser interprets and displays the HTML page.
Please note these points about the above explanation:
- The process is almost the same even if you request a page that is on your local machine, if you have a local PHP server installed. The main difference is that a DNS is not involved.
- The "computers" in the diagram are intended to show that the Web and PHP servers and the database server are sometimes on different computers. But the Web server and the PHP server must be on the same computer.
Setting Up PHP
Please Note:
You do not need to set up any PHP installation to work the assignments in this course. The information on this page is for your possible future reference, only.
The Web server where you will be uploading your assignment pages has PHP running on it already.
Internet Service Provider
If you are going to host your PHP with an outside Web provider rather than on your own server, you need to get information from the Internet Service Provider (ISP) about:
- What version of PHP the provider is running.
- How many datasources the provider will support.
- What kind of datasource updates the provider will support. Will you be able to upload updates yourself?
- Where you will be required to put your database.
- Whether or not the PHP e-mail function is turned on.
- Whether or not the PHP file- and directory-handling functions are turned on.
But please note that you are *not* required to get a hosted web site in order to take this class! You will be uploading your assignment pages to a school server which has PHP running on it.
The ISP that I use for my www.jimlink.net site is running PHP 8 on their servers. (Actually, I can run just about any previous verion, also. We are going to use PHP 5 for this class.) The functions that I mention above are turned on. If you want a reliable ISP with great customer service, consider using GoDaddy as your ISP.
Later in this course, I will tell you how to set up the database datasource names.
Local PHP with XAMPP
You can install PHP on your local computer with the XAMPP system.
But please note that you are *not* required to install PHP locally in order to take this class! You will be uploading your assignment pages to a school server which has PHP running on it.
If you decide to run a local PHP installation, you can follow the instructions in the book, or you can use the following instructions, which are pretty much like the instructions in the book, starting with page 8. I have added some hints of my own.
- Download the XAMPP installer at https://www.apachefriends.org/download.html. I used these links at
this site:
- XAMPP for Windows
- XAMPP Lite
- EXE
- The download didn't start automatically, so I clicked the "direct link" link at the top.
- I saved the .exe file in a local directory
- Navigate to the .exe file and run it. You can safely use the default settings and answers to the questions that the installer asks.
- When the installation is complete, go ahead and run the XAMPP Control Panel. If it opens, make sure Apache is started. Then go ahead and close the Control Panel window.
- Now open a browser (such as IE or Firefox) and type this URL into the address
field:
http://localhost
and you should see the XAMPP for Windows (assuming you did a Windows installation!) "Welcome" screen. You can also click the "Status" navigation link in this "Welcome" screen to see if everything is running. It is okay, and expected for this "Lite" version of the installation, for the "Perl with mod_perl" and "Apache::ASP" indicators to be red. - Click the "Security" link at the left side of the "Welcome" screen. You will most likely see some red boxes which indicate that your installation is not very safe.
- Click the link in the Security page, which allows you to "fix the problems for mysql, phpmyadmin, and the xampp directory".
- Enter a password for the MYSQL SECTION and click the "Password changing" button. I clicked "No" for "Set a random password...".
- Now enter a username (I used the xfd user as in the book) and password for the XAMPP DIRECTORY. Click the "Secure the XAMPP directory" button.
- Now when you click the "Security" link on the "Welcome" page, you should see some green "SECURE" indicators.
- And now, since you have secured your local installation of PHP, when you type
http://localhost
into your browser's address field, you may be required to enter the username and password that you set. This is a good thing.
Local PHP with WAMP
You can also install PHP on your local computer using the WAMP system.
But please note that you are *not* required to install PHP locally in order to take this class! You will be uploading your assignment pages to a school server which has PHP running on it.
If you decide to run a local PHP installation, you can follow these instructions:
- Download the WAMP installer at http://www.wampserver.com/en/. I used these links at
this site:
- DOWNLOAD
- WAMPSERVER (64 BITS & PHP 5.3) 2.2E (But be careful! If you have a 32-bit Windows system, you will need to get the next installer in the list, for 32 BITS.)
- Follow the instructions.
- Now open a browser (such as Chrome or IE or Firefox) and type this URL into the address
field:
http://localhost